Sunday, November 12, 2017

Running: The Greatest Metaphor for Life

Today was my first half marathon in years.
I went into it thinking I would easily finish in less than 2 hours, but the running gods thought otherwise.

While I was disappointed to not beat my goal time, I was happy to see my running friends and to have experienced the whole thing.
The gift to run is something that not everyone will understand so when you surround yourself with those who do, it is not just supportive, but bonding.
After I texted my sisters back when I noticed their well-wishes for my run today, my twin texted me this in response to my text that I was bummed about my time:

“Don’t be bummed. Celebrate! Why not? You did really good!!! Besides, celebrate your health. You ran for those who could not. I’m proud of you.”

These words of encouragement, the support from the cheering crowds, and just the bad-assness of running are what keep us runners doing this.  From obsessing over our form (which mine was off by the way), to appreciating good socks and shoes, and hoping for a good PR, running just does something to us.  More than anything, it helps us deal with life and approach it head on.
And while some runners may have a race where they DNF (do not finish), the ones that they do finish, are always an accomplishment that earns you more than just the medal and a shirt.  
The combination of relief and excitement that hit you when you see the Finish line with the crowd (we love you and yes you do bring us in!) is something that always keeps you coming back for more; and this is no small feat since we always wonder why do I still do this?-at mile 5, mile 9, at mile 11, and at zero miles when the alarm goes off.
 Inspiration is on the course too. You will hear other runners encouraging each other on. Plus, you will read all kinds of signs and shirts with mantras or quotes.
Today, the one that got me through at mile 9 was a lady runner’s shirt that was a quotation from John Bingham (the author of A Beginner’s Guide to the Joy of Running):

“The miracle isn’t that I finished. The miracle is that I had the courage to start.”


Sunday, July 23, 2017

Debunking the Fountain of Youth

My hubby: My number one inspiration. He actually went WFPB first! A story in and of itself! 
My older  sister: She tried to tell me and I didn't listen! But she is older than me but looks the same age and can kick my ass in running. 


So here we are again.
I fell off the face of the Foodie Blogging World a long time ago (Mainly because I always felt too tired to share my experiences as much as I liked doing it. This would become a theme).
However, I never lost my love of making new foods.
Yep, while I love to try out new foods and share them, I usually eat to have energy reserves for my body not for just enjoyment or therapy.
Where we last left off, I was mostly running to eat; now I eat to run.
There is big difference in that  strategy.

For the most part, I always thought I ate mostly good foods and could afford to eat bad foods every once in a while. In my head, I ate an 80/20 diet (healthy food versus splurge food ratio) and was drinking "the booze" in amounts depending upon how much I ran that day or felt I deserved it. I attributed much of my lack of energy to genetics or getting older. Man, was I so wrong on a lot of that.

In my journey towards continuous improvement towards a happier and healthier me, all the books and articles I read and people I encountered seemed to be pointing me towards the right direction: CI my diet.  So, I did. And it has made the world of difference.

While I still believe in mentally coaching yourself throughout the day to handle your life in a more positive manner, exercise to feel good and bad ass (not everyone does it), and make sleep a priority no matter what, I am going to tell you that without the best eating lifestyle you can make for yourself, the other three will only numb your negatives not highlight the positives that make it easier for you to feel and recognize them.

Think about it, when you are overloaded at work, how well can you possibly be doing it? Will it really be your best work? Sure, a brisk walk and a little nap may help you from tanking or going postal, but if your workload remains the same, you are just putting a band-aid on it, and eventually, it will break you down.

The same for your body. It will start to break down.

The one thing we all have in common is the diet. Look all around most cities and the diets are similar with just a splash of their own regional character. People are still getting sick and addicted to foods that are not good for their bodies or quality of life.  It's the diet. We have taken it too far from what it was supposed to have been and made it something that is working against us. Just look to the left and right of you any day and possibly in the mirror and you know, it is the truth.

What do you have to lose on a whole foods, plant-based diet?  The answers:
1) Fatigue
2) Dr. Visits
3) Medications
4) Negative feelings
5) Physical restraints

This next chapter will be me sharing my awesome new life on a Whole Foods Plant Based (WFPB) diet and how it has been my Fountain of Youth.  Because, the fountain of youth is our bloodstream and just like you don't want to swim in polluted waters, your body doesn't want to be fed by a polluted bloodstream.  Kinda heavy? I won't always be. This is my missile though.


Tuesday, July 7, 2015

Cooking on Vacay is Okay By Me

A picture from our beach entrance at Seagrove Beach, Florida. 


So here is my second attempt at posting on my old food blog-again. What better time to start then on my vacation? BTW, I sincerely apologize for the bad formatting on the last blog!

This year my family and I took advantage of the low gas prices and drove past the Texas state line for vacation. We found ourselves in beautiful but busy Seagrove, Florida. Seagrove is charming. Really. But charm has a price and if you don't believe me visit a local restaurant there.

So when you are a family of 7 you really do find ways to enjoy paradise on the cheap as much as you can.
One way is to rent a place with a kitchen and find the chef inside of you. Drinking wine helps. Promise.

I love to cook so it really is more of an adventure for me. I would be stretching the truth if I said I find it easy to cook in other people's kitchens. I don't. In fact, throw me in the ocean off the beach because I feel like a fish out of water when I am cooking in a different kitchen .

On night one of our vacation, I wanted to make something different but easy, for our family dinner, so I Googled easy family dinners or something like that and found a recipe for Chicken Pillows.  This recipe is perfect for cooking in a foreign kitchen, too!

They are super easy and seriously were a hit with the family. If you followed my blog in the past, then you know I love easy dinners that don't taste like they were easy.  This recipe fits that bill.

Chicken Pillows with cream of chicken gravy and slow cooked green beans with ham flavoring.

Our first family dinner on vacay. Don' they look super happy?
I know most people don't enjoy cooking, much less on vacation, but really it is special to cook a family meal in a different place with a gorgeous backdrop. It is also fun to bake these for your family at home too.


Also you don't have to be perfect when folding and filing these up The pastry is very forgiving.
I would recommend eating these the same day. They do not taste quite the same the next day.
Also, use precooked chicken breasts or rotisserie chicken to make it even faster and easier.
I used a rotisserie chicken and it made the whole process super fast.


This way you can enjoy more beach time with the family. Happy cooking and vacationing!

Friday, June 5, 2015

Do You Still Do That Food Blog?

After I went back to work a few years ago, I  remember I used to get this question all the time: Do you still do that food blog? Another popular question was (and is) do you still bake and cook?

Truthfully, I cook all the time, but bake less often to watch the calories and sugar that come into the house.  It is been a super long time since I last posted anything I created in my kitchen. My  weekday cooking and baking morphed more into 30- minute meals, than my past  Food Network creative days, but I still love the feel of standing behind the island prepping and playing Chef, or short-order cook. It relaxes me after a long day.

Even while on my blogging hiatus, I continued to take pictures, with the hope that  one day I would blog again.

 Well, last night, I picked up my lap top and thought; why not? You miss it. You can fit it into your schedule. The kids are older.  There are no pressing  deadlines. And you enjoy it. A love of writing, cooking, baking, and entertaining is the essence of a blog that will be good aromatherapy. So here I am, blogging again.

Among my many passions (okay more like 5), I also love to read. Books have always been my friends and great escapes. I am in my neighborhood's book club and it is often at our  monthly get-togethers that I try out new recipes to take for our potluck.

The last book we read was Orphan Train by Christina Baker Kline, just in case you wanted to know. 

The hostess was serving a casserole as the main dish and I needed something to pair with it, but that would not be overwhelming or even worse, UNDERWHELMING. Therefore, I chose to "bling" up some green beans.


Ok, it is not the best picture but I swear it is a nicely presented dish.
My inspiration for this dish came from several recipes I found on Google. What I do is read a few recipes I like and Frankenstein  then into ONE recipe that represents what I liked in them.

And I came up with this....

Carolina's Souped Up Green Beans, but not in a soup.

Here is the recipe:

Ingredients

Kosher salt
1 1/2 pounds of fresh, trimmed green beans
4 slices of center cut bacon
4 oz. of Blue Cheese Crumbles (split portion in half)
1/2 small sliced strips of sweet red onion
1 1/2 cups of chopped toasted honey roasted pecans

Directions

1.Bring a large pot of salted water to a boil over high heat.


2. Add the trimmed fresh green beans to the boiling water and cook for about 2 minutes. 


3. Remove the beans from the boiling water and strain them through a colander. Top the colander 


with ice cubes and cold water. Allow cold water to run over the green beans in the sink for extra 


cooling. This prevents the green beans from continuing to cook and remain crisp.


4. Remove the green beans from the ice water and set aside in a medium bowl. We will come back to 


them later.


5. In a large saute pan, over medium heat, cook the bacon until crisp. Remove the bacon and place on


paper towels.We will come back to it later.


 6. Add the beans and sliced red onion to the bacon drippings and cook over medium heat for  3 


minutes. See we came back to the green beans!


7. Break the cooked bacon into bite-size pieces and add to pan.  We came back to the bacon, too!


8. Add 1/2 the Blue Cheese crumbles to the pan with the green beans and bacon.


9. Allow it to finish by stirring in the  chopped pecans. Allow 30 seconds to 1 minute to cook.


10. Season with the freshly ground black pepper and just a tiny pinch of kosher salt, plus sprinkle 


remainder of blue cheese crumbles on top.


11. Serve immediately.       

Tips to make it the recipe easier, a.k.a., faster to make:

  • Use pre-trimmed fresh green beans
  • Use packaged crumbled cheese
  • Use canned pecans

I think next time I make this, I will add  dried cranberries to the mix. Different hard cheeses could also be used, as well as,  fresh parmesan and maybe tossed mozzarella balls at the end, instead of a hard cheese.  Of course, other types of nut can be used or nuts and onion omitted just the same if needed. 

Let me know how it goes when you make this. It will be a new side dish to add to your recipe savers! 

More to come.... I hope! Still cooking, still baking, and for the moment, still blogging. 

Have a great weekend! 


Tuesday, February 21, 2012

TWJ: Baking With Julia's Chocolate Truffle Tart

Wow! It is crazy how crazy the week can get. Not only have I been really busy, I have been super-tired lately. I think it has been this overcast weather. I hate it! Although it is good for baking, so that is just what I did.  Please head over to the Tuesdays with Dorie site to take a look at all the tarts that were made using Julia's recipe. Our hosts are featured over there, too, and they made some really nice looking stuff.

Mine came out rather nicely, even though I refused to try to roll out the dough and just pressed it into the tart pan like I learned from Dorie Greenspan (the D in Tuesdays With Dorie) from her Sweet Tart Dough recipe.  I must admit, this recipe was not as hard as I thought it would be and I managed to make the dough after work and the filling after the next work day. It all came together just in time for my Friday night book club! The only substitution I made was using Girl Scout Thin Mints instead of the biscotti. I did not buy any biscotti and just had to wing it! It was a really good substitute, too, in my humble opinion!

Here is how it went:


Me pressing the dough into the pan. Wrapped and froze it to bake the next day.

While the crust was cooling,  I mixed the filling together. Another forgiving recipe, because I guessed on everything; the whipping of the egg yolks, measuring out chocolate, and folding. 

And with all the guessing including the baking time (filling never seemed to be set enough), miraculously everything came out just fine!


My crust was a little crumbly, but it did taste cookie-like.


It kind of looks like a giant Reese's Peanut Butter Candy. 

Overall, it was pretty good. Next time, I think I will cover it with a ganache and build up the tart edges more on the side. This dessert did taste similar to a pudding-like brownie.  I think I would have liked the crust sweeter, but I did enjoy it better the next day as it had perfectly chilled in the fridge.

Next time, I will use the biscotti and try to roll the dough out.  There is always next time and I am pretty sure I will be make this again.

Next  up for Baking With Julia is rugelach. Hhhhmmmm. That looks good, but challenging.
Next up for my blog: The Ultimate Carrot Cake! It was that good.


Happy Baking!

Tuesday, February 7, 2012

TWD Baking with Julia: White Loaves

I am so happy to be finally paying attention to my little food blog. Yes, my food blog may not get as much traffic as other big blogs (a.k.a bligs, out there) but I am happy to keep her going and to have the small following that I have. I am happy to be back with the Tuesdays With Dorie gang and baking up stuff I have never tried before, which brings me to the first challenge, homemade white bread.

I have never made homemade bread before. Sure I have made quick breads like pumpkin and banana bread, but never bread that called for dough hooks, resting, and rising. This was a treat for me and I learned a big lesson over a little thing.  In my rush to bake my bread on a rainy Saturday morning, I failed to check my yeast mixture for foaming and simply tossed it into the dough mixture after ten minutes of sitting.  When my dough failed to rise after 1 1/2 hours and desperate warming up (think griddle),  I tossed it into the trashcan. I wish I had not done that after reading that I could have made some good flatbread out of it! Note to self, make sure yeast has foamed like beer before tossing it into the dough AND never throw away unleavened dough.

On my second attempt to bake this bread on Superbowl Sunday, I made sure that my yeast was good and that it looked like this:
Foamy yeast=good yeast
I also made sure to use a good bread flour. King Arthur Flour always seems to get rave reviews from the baking community. For this one instance, I  fought the urge to use my usual generic flour (which I like a lot) and splurged on the KAF.  I was covering all my bases the second time around.

May need to conduct a flour challenge soon!

 Here are some images from my first homemade bread baking experience.

Nothing like the Kitchen Aid mixer dough hook giving a good beat down! 

Pretty. So soft and smooth. 

Rise and shine. The trick is to let the dough rise long enough to fit the pan. 

Luckily I checked my bread at 30 minutes, because it was perfectly done! Thought it was overdone at first, because the bread felt hard. Upon cooling, it softened. I immediately froze the second loaf a little after it cooled.

Used the other loaf to make my son a PB&J sandwich. Now , that is love!
The bread was fresh and soft.


I would be lying if I said I did not get scared when I added in the softened butter and my dough started looking like it was falling apart! Yes, I know the instructions said this would happen and that the dough would come back together, but after my first run-through, 'what if' played through my mind.  I would also be lying if I said that seeing the simple chemical reaction of yeast acting on sugar happening before my eyes did not always amaze me. I loved seeing the dough rise and rise some more. It is magical. Ah, food science.

I asked my son after  work today how he liked the sandwich I packed him for school. He said he thought it was good. I let him in on the secret that it was made with the homemade bread I had baked.  He was surprised. 

"Mom, I thought it was store-bought bread. It was good!" 

Uh, thanks, son. I think? 

Still, I highly recommend baking your own bread. It is a very satisfying experience. It made the house smell great and is still an easy way to impress your friend, family, and neighbors. 

Thanks, Laurie of Slush and Jules of Someone's in the Kitchen  for hosting this challenge. I loved it! 

Inquiring minds can find the recipe over at their sites or in the book, Baking with Julia, pages 81-82. 
It is a very forgiving dough. I really did not do a good job of rolling it out (eventually I just hand-shaped the rectangle) or folding (did two different folds) it into the pan and it still worked! I also learned that you should let your dough rise at a room temperature of 80F. I turned on the the heat before mixing and allowed the dough to rest on my range near two burners that were on medium high.

Happy Baking!


Tuesday, January 24, 2012

Over Easy Does It


Eggs  Over Easy with Gruyere Cheese 

Putting the toddlers to bed is NEVER easy in the Little household. Trust me.  It takes a good 30 minutes of fussing and whining, before the kids let us leave the room. Then, it is another 15- 30 minutes for them to fall asleep, if we are lucky. By the time it is all said and done, we are wiped out. Yes, we feel like we  have been put through the ringer. Toddlers have a way of making you feel like you have met your match, if you were a match for them.

With this chaos awaiting us every night, it is no wonder that I really like to cook up simple foods for the family, especially in the morning. Here is a recipe that I saw on The Chew the other day while I was running on the treadmill in the gym. While I am not a big fan of the show, it is something to watch while I am running out my miles. Mario Batali demonstrated one of his favorite meals to make for himself while his family is away, Duck Eggs Over Easy with Fontina. Since I did not have duck eggs (which sounds amazing to me) and no fontina, I improvised. A girl's gotta do what a girl's gotta do. This is what I did:


Cooked hen eggs sunny side up  on medium heat with melted butter until inner whites are firm with melted butter.
Then, topped with Gruyere cheese.


Gently flipped egg over to cook over easy for 15 seconds.
 I did baste it with a little butter. 

Did the other side as well. Be careful NOT to over cook.
Should take a little less than 15 seconds more.
Finally, I topped toasted wheat bread with  the over easy eggs.  Sprinkled salt and pepper and more cheese over eggs.
Next time,  I will use a heartier whole wheat bread that this meal deserves.
For me, the best part of the meal, besides being quick and easy, is the runny yolk flavored with nutty and slightly sweet gruyere cheese oozing all over the toasted bread as you cut into it.  The taste is simply divine.  It is a simple meal to make every day, for a Sunday brunch, or a solo dinner. Paired with fruit and a good juice or my preferred cup of coffee, this dish is just SIMPLY perfect.

What takes do you have on making this dish even better?


Saturday, January 21, 2012

Cooking Light's Incredibly Easy Cocoa Fudge Cookies

Cooking Light Cocoa Fudge Cookies

I absolutely love to bake on the weekends. For me, it is my "me" time. I especially love when I find a recipe that is easy to make and tastes like it wasn't. This is one of those recipes.

When I woke up this morning, I knew I had to bake something, but since my hubs and I are doing the buddy-system weight-loss thing, I had to make sure that whatever I baked was semi- lightened up.  We have been doing a pretty good job so far counting calories, but I must create something sweet. Anything.  So, it might as well be a lower calorie, lower fat recipe that promises to taste like the real deal.

I scanned for chocolate treats on the Cooking Light website. One because we love chocolate. Two because chocolate is therapeutic. Three because Valentine's Day is around the corner and well, I promise that day will be full of tempting treats coming out of my kitchen. I can't help myself. Food is love d@m*it!

While there were several beautiful recipes to be found, I settled on this one, because it looked easy and pantry-friendly. Looks can be deceiving , but not in this case. This recipe is really easy to do in a pinch and if you are used to baking semi-regularly, then you should have most of the ingredients on hand. This is close to being a 30- minute recipe.

Here is how it went down:

Melt butter.  Remove from heat and add cocoa. This is glorious. 

Next, add sugars to the cocoa mixture. Will look coarse.

Add yogurt and vanilla extract to the mix. 
Then, stir in the flour mixture. 
This is how the battered looked after I was done. Ugly, but tastes so good!

Drop the batter into tablespoon balls on lightly greased pan. Then, bake in a preheated 350F oven for 7-10 minutes.


Allow cookies to cool on pan until firm (2-3 minutes).

Then, allow cookies to completely cool on rack. Recipe makes about 2 dozen cookies. 

I made one substitution. I used vanilla-flavored low fat yogurt instead of the plain stuff. I never buy the plain stuff, but I should for instances like these. However, I lucked out, because vanilla extract was an ingredient called for in this recipe, so I felt justified.  To make up for the yogurt, I reduced the extract to half a teaspoon.

These cookies were super-fudgy tasting. They also had a cake-cookie texture. My husband agreed and said he could eat the whole batch, so I put them out of sight in the pantry. They are now property of the boys and girls in the Little household. If we do well on our calories for today, I will sneak one out for me and him. To the victors...

Next time I bake these babies up, I am going to dip half of them in dark chocolate. I think that would dress them up nicely. A little sprinkle of flour de sel may look spiffy, too. These are definitely the little black dress of cookies.

Give them a try and tell me what you think. Time for me to go run, so I can earn my cookie!


Saturday, January 14, 2012

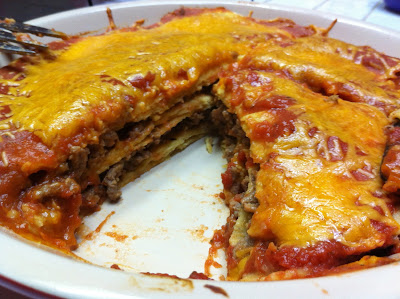
Cooking Light Enchilada Casserole

Here is a post for those of you who made the resolution to eat better in the New Year for health reasons or  to lose weight. My hubs and I are always interested in eating a low-cal, low fat recipe that does not involve rabbit food. We are all about the comfort food. While I can appreciate a good salad and a side of fruit, it is just not his thing. For this reason I am always on the hunt for a hearty meal that has been lightened up. Hence, today's post reviewing Cooking Light's Enchilada Casserole found in their Jan/Feb 2012 edition.

Enchilada Casserole from Cooking Light


The recipe ( <-- click for the recipe) is ready in 40 minutes and what I especially like about Cooking Light is that they offer you a game plan (Rachel Ray's magazine does the same thing). This is a big help. What I HATE about some recipes that have "Ready In So Many Minutes"- claim is that they usually don't come anywhere near that time frame. They usually go over. This one doesn't. In fact, because I did not make the spicy black beans side that accompanied this recipe in the magazine, my time was shorter by five to ten minutes. Even if you make the beans and should see the 40 minute mark, then I promise you, this meal is really easy to make, even for a weekday.

While I usually try to stay true to a recipe, I did make some substitutions. First, I  added corn tortillas instead of whole wheat flour. To make the serving size of 4 spread out, I used extra layers of tortillas. I also used lean 96/4 ground beef instead of sirloin. I also used fresh minced garlic instead of minced garlic from a jar.  The casserole hit the spot. The only tip I would use when I make this recipe again (and I will make it again soon since the entire family liked it) is to dip the tortillas in the sauce tomato mixture before layering and baking. The tortillas need to be soft like a really enchilada. My casserole had al dente tortillas if that makes any sense, but it was still good.

What is the damage after it is all said and done? According to Cooking Light it is the following:

Calories- 377, Fat- 14.6g (sat 7g., mono 5.3g, poly 1.6g), Protein- 302g, Carb- 32.4g   (please visit the recipe for the rest of the nutritional values)

Not too shabby, when you consider the non-lightened up versions can run you up to twice that or more.

How to make your house smell like a Mexican Cantina...


Well, I am looking forward to starting up Tuesdays with Dorie soon. We will be baking from Baking with Julia by Dorie Greenspan.  I am sure my coworkers will enjoy it too, since they will be getting most of the goodies so that all my Cooking Light efforts are not in vain!


Sunday, January 8, 2012

Louisiana Fish Fry Cajun Etouffe Review

photo courtesy of Louisiana Fish Fry website

I moved to the great city of Houston, Texas, almost 11 years ago from my hometown of Wichita Falls, Texas. To that point, the most exotic food I had eaten was Chinese. However, after living in an international city such as H-Town for over a decade, I have been privileged to taste all types of cuisine from Indian to Brazilian and everywhere in between and beyond. However, the food that I have come to adore the most is Cajun cuisine. I had lived here for well over 7 years before I really came to appreciate the stuff. It is no coincidence that this happened to be about the time I married my hubby and he took me to his hometown of Lafayette to show it off. While not all of the food joints he took me to upon our visit were Cajun, the ones I remember  fondly are. Since eating at the abundant Cajun places there and here in Houston, one of the foods I crave the most BY FAR is étouffée. I love it! It is a well-spiced gravy-like dish usually served with chicken, shrimp, or crawfish blended in over rice. I love it served over a good buttermilk biscuit, too. It is great comfort food. While it can be served as a side, I tend to eat it as a meal. I guess you could think of it like macaroni and cheese, but better.

My thing is to compare homemade recipes with grocery store fare. I will try lots of short cuts and mixes just for fun and to share with busy cooks. While homemade étouffée is not hard to make, nothing is easier than ripping open a bag and mixing stuff in and allowing the combination to cook. The hardest thing is making such an effortless concoction taste, well, as good as homemade. So when I browsed the  aisles at the grocery store for étouffée mixes, I came across Louisiana Fish Fry 's Cajun Étouffée mix. It had received great reviews, so I was very eager to try it!

Here is how it goes in a nut shell:

Melt butter in a good pot, like a Dutch oven. 

Then, slowly add mix into the melted butter while stirring. 

Allow the mix to cook just until the mix turns a medium brown.

Finally, add water and meat of choice (in my case shrimp) and allow dish to finish cooking.


Serve étouffée over cooked rice and enjoy!


It was really this easy to do. The cooking and setting time (after dish is made) take almost 45 minutes. But it is a dish you can bring together in a pinch and walk away from with just occasional stirring in between. I made this dish on Thursday night for my family, so it is definitely easy to do during a work week.

But how was the taste? The taste was really good and authentic, but a little cheesy tasting, which is not a bad thing at all! My hubby really liked it and so did my boys. While it does contain Cajun spices, it is not overly spicy. But, if you have kids who do not like spice even in moderation, then this is not the meal for you. But, it is definitely a good meal to choose for company.  When using shrimp, add less water than the instructions call for, because of the extra water the shrimp will release upon cooking. I used 3/4 cup less and that seemed to work fine.

On the Louisiana Fish Fry site, I gave this mix a 4.75 out of 5.  All products have room for improvement, especially regarding salt content.

Well, that is all I have for now folks. Happy Sunday and happier eating!

Now, GEAUX try it.


Saturday, December 31, 2011

Hold-The- Mayo-Please- Artichoke Spinach Dip


Healthy and Delicious: Spinach Artichoke Dip from Serious Eats


I miss blogging. How many times have I said and written this? Several. I still cook and bake like crazy. I still take photos using my trusty iPhone. I still think of how awesome it would be to blog about what I am cooking and baking on a daily basis. After all, my number one way to show I care is too cook and bake for someone or everyone and/or to share recipes that I am excited about or have tried.  While I never make New Year's resolutions, I do think that it is as good as a time as any to recommit myself to my blog.

I had hope to share the following recipe on Shelby's site over at The Life and Loves of Grumpy's Honeybunch for her 4- year  blog anniversary highlighting appetizers, but of course, I ran out of time and steam. So, dearest Shelby, I am sorry, but I want you to know that your blog is one of the first food blogs (or blogs period) that I ever followed and you will always hold a special place  in my blogosphere for that very reason. Another reason is Shelby has a really down-to-earth and amazing looking  blog. Her site is really good. I strongly recommend that you go over there and take a look at her life and loves and cooking.

If you know me, then you know I HATE mayonnaise and Miracle Whip. I can't stand either of them and never use them when I can help it. That is why when I was looking for a spinach artichoke dip recipe that did not use mayo, I googled, spinach artichoke dip that does not use mayo. Brilliant, I know. The recipe that came up was this one from Serious Eats.  I especially like that it does not use frozen spinach, which at times, IMHO, tastes like seaweed. I love using fresh spinach. The recipe is deemed as "aces", so I just had to try it and see if it is.

It is.

My spin on the recipe was to divide it into individual ramekins for serving and placement. I also added extra mozzarella on top of the spinach artichoke mixture before baking it to give the dip a little more poof and brown puffiness. Other than that, I stuck true to the recipe and LOVED it. The recipe  calls for three cloves of garlic which really is perfect for a garlic lover like myself. This dip came out creamy and rich and complimented the Stacy Pita chips I served along with it. I highly recommend this recipe EVEN if you like mayo.

I wish all of you a Happy New Year! I really hope to see more of you in the New Year and will stop by your blogs very soon to see how y'all are doing and what y'all are making.

Be safe and be happy!


Saturday, November 5, 2011

Easy Does It: Homemade Candy Bars

With a house full of chaos, a full-time job, and a passion for cooking and baking, the saying, "easy does it" fits right in in my household. I found this recipe somewhere last year and fell in love with it. It is easy and tastes just like a Butterfinger.


I took  a dozen to work and they were gone in minutes! Made some more for a quick dessert after work last night.

Crisp peanut butter centers covered in smooth milk chocolate.


They are so good that people will assume they were difficult to make, but they are not.  Here is the recipe:


Ingredients


1 Jar of Smooth Peanut Butter
1 box of graham crackers
Melting chocolate (I used bark chocolate)


Directions


 First, make small peanut butter sandwiches with graham crackers. Then, chill the sandwiches in the fridge for about 30 minutes.  Finally, dip the sandwiches in the melted chocolate using tongs or roll the sandwiches around with a fork in the melted chocolate. Place the  chocolate- covered sandwiches on wax paper until the chocolate sets.  For the swirls, dip a fork in the melted chocolate and swirl over set chocolate sandwiches. Then, let the sandwiches sit for just a little while longer until that chocolate sets. If you wish, place the now candy bars into the fridge to have icebox candy bars or eat as is. 


This is a really simple recipe with three ingredients.  These are great for an after school treat or midnight snack. However, for Christmas, I plan on making a variety filled with marshmallow creme, Nutella, and caramel, as well as, peanut butter. They are a thoughtful and inexpensive gift to make for several people, such as, coworkers and neighbors. I may even take them to my next cookie exchange.

I have been gone for a long time and have missed blogging. Now, I hope to come back more often, at least once a week, to share my fall baking and kitchen adventures with you all once again.

Happy Fall Back, everyone!